 When life gets crazy, it’s easy to put everyone else’s needs above yours. Your job, your family, and other commitments may take priority to keep the plates of life spinning.
The result is physical and mental fatigue that can take a long time to fully recover from. People get burned out and need to leave jobs or end up with serious health issues as a result of stress and anxiety. Don’t find yourself in that position! There are many ways to keep even the smallest amount of focus on yourself no matter how crazy life becomes. Relax and Play Even the busiest people need to take time to quiet their mind and relax a little throughout the day. Children play all day long and can be a great inspiration for this — sing a silly song, play a game, draw a picture, run around, or do whatever else is going to put your mind at ease. You’ll be surprised how much less stressful the rest of your day feels once you take that mental reset. Disconnect and Unplug Getting away from the screens we stare at all day long is another important aspect of that mental reset. Your email, calendar, texts, and voicemails will all be there when you come back. Stepping away from those distractions will allow you to clear your mind and dive back into the day refreshed and ready to go. Ask for Help Many of us become overwhelmed when we try to take on too much. We can’t say no when new projects or tasks come up because we don’t want to let others down, and our own physical and mental health suffers as a result. Stop this behavior by asking for help when things get to be too much. It will not be looked upon as a sign of weakness, but rather that you understand your own limitations and do not want to let the quality of your efforts suffer as a result.
0 Comments
 Granite countertops are one of the hottest trends today in kitchen and bathroom remodeling. Why are they so popular? Granite counters are uniquely beautiful, incredibly resilient, and germ-resistant hygienic. They can also do wonders for your home's property value. Unfortunately for home owners, all of these great attributes typically come at a high cost. Here are four tips to more affordably get those beautiful granite countertops you've always wanted:
1. Buy online Purchasing your granite countertops online online can help you source the absolute best price for that custom look you want in your kitchen. Online sellers are forced to align their prices to meet the many online competitors in the market, which give you tremendous bang for your buck. The one drawback to buying online is that photographs don't always do justice to the look, feel and color of the granite. Look for online sellers close to your hometown if you'd like to see the material in person before buying. 2. Choose a less popular color The granite color you choose will greatly impact the design of your kitchen, and it will also impact the price. Tan, black and white granite all go for top dollar because neutrals are the most sought after. If you can make a less popular color work in your kitchen, you may benefit from a great deal on a more unique looking slab. 3. Avoid big box chain stores If you go to one of the home improvement giants then prepare to pay the big bucks. Even if a slab is labeled as “on sale†it may still be priced well above what it can be found for at a wholesale warehouse and you'll be missing out on a much larger selection since big box retailers typically only carry 10 to 20 different color configurations if you’re lucky. 4. Buy pre-fabricated granite Here's a little secret that most granite installers don’t want you know about: it's called pre-fabricated granite and it is taking the kitchen world by storm. Pre-fab granite can provide the same quality Italian stone, a perfect fit for your kitchen, and the exact same durability for nearly half the cost. How, you ask? When you buy a traditional unfinished granite slab the installer not only has to cut the granite into the proper pieces to fit your kitchen but he also has to finish the edges. This labor costs you big bucks—the labor to install and finish can sometimes cost twice as much as the granite slab itself! Pre-fabricated Italian granite is typically shipped to China to be manufactured, so a huge percentage of the labor you would normally require for is absorbed into the cost of the pre-fabricated granite you purchase. All your installer has to do is pick up the granite from the supplier, take it to your home and do some basic dimension cuts. With the edges already neat and finished, the installation can be done in one day which saves you a TON of money. Even if you are working with strange dimensions in your kitchen or bathroom, there are now multiple widths and lengths of pre-fab granite up to 11ft long.  Moving can be hard on everyone in the family, but can be especially stressful if changing schools is involved. Luckily, a summer move gives children the chance to start fresh for the new school year. The following are ways that families can help their students adjust after a summer move.
1. Meet the neighbors The combination of no school, warm temperatures, and short nights means that many families spend their summer evenings playing outside. Take advantage of this opportunity to get to know your neighbors; even if you don’t have kids the same age, they can give you tips and tricks about the local schools as well as help connect you with potential playmates for your children. Most neighborhoods will have at least one or two other children the same age as your kid. Even if they won’t be in the same class, starting a new school can feel less intimidating when you already have several friends. 2. Go to summer school Many schools offer summer enrichment programs or day camps on campus. Signing up for these programs not only helps your child be more familiar with their new school building, but it can also help them meet new children who will be attending school with them in the fall. 3. Sign up for sports Signing up for a local sports team is another great way to make connections with other students and families. As sports teams are grouped by area and age, there is a good chance your child will be on a team with students from their new school - if not their new class. 4. Get involved at the new school Joining parent groups such as the PTO can be an additional support as children acclimate to a new school. This benefits both parents and children; as parents meet other adults with similarly-aged children, playdates and other outings can be easily arranged. Likewise, joining a parent group will show your child you are also interested in learning about their new teachers and school. 5. Take a trial run The days leading up to the start of a new school year are stressful for everyone, but doubly so for those starting a new school. To make the first day more enjoyable, try taking a trial run; about a week before school starts, practice everything you are going to do the first morning. Set your alarm and wake up at the new time, get ready and practicing walking to school or the bus stop. If time permits, drive to the school so they can get more familiar with the route and any landmarks along the way. Likewise, take advantage of any open houses or meet the teacher nights the school hosts as a way to explore and get familiar with their new school and classroom.  For kids, their room is a safe haven and a fun place to spend some alone time. If they are involved in redecorating it can also be a place they love.
You can thumb through decorating magazines and find kids’ rooms that leave you breathless: white carpet; a canopy bed; a neat computer desk, quirky toy storage, and display areas. But the first question you should be asking yourself is: How would my child view this room? How can you balance your personal design tastes with what your child wants? Will the room grow with your child? Here are some hints for making your child’s room his personal space. Let them help. Whether it is a single or a shared room, let your child help pick out paint, pictures, furniture, and flooring. Offering a range of two or three choices makes it less overwhelming for your child and lets him make “final decisions”. If his favorite color is orange or purple, for example, consider a feature wall or trim in his favorite color. Make sure the room can grow with your child unless you are considering frequent renovations.His favorite characters and colors today may well be discarded tomorrow. Let him choose bedspread and sheets instead of carpet or walls. These items are going to be periodically changed. They are the easiest (and least costly) ways to update the décor. Consider a room theme—such as cars, trains, spacecraft, cartoon characters, or dogs—that fits your child’s interests. Make sure there is space to display your child’s treasures safely and that he can reach it. Make way for work areas for homework, games, construction projects, art work… and for storage of toys, construction sets…Make it as easy as possible for your child to clean up and to locate what he is looking for. Involve your child in finding accessible spots for his clothing. Let him help you make labels for things. Bins, shelves and hangers he can reach are ideal ways to encourage “a place for everything and everything in its place!” While you are redecorating, it is an excellent time to take inventory and decide what should go and what should stay. Make this a parent-child activity. Use three bins or boxes for: things we are keeping; things we can donate to Goodwill and things that should go to recycle or trash. If your child is involved and given choices at every stage of the redecorating,it will instill a sense of pride and ownership.  Buying a home is about much more than the listing price. From taxes to insurance, there are several things you’ll be expected to pay that you might not realize. Planning for them now will help you avoid adding more stress to the process or encountering a surprise once you sign on the dotted line.
Property Taxes Property taxes are a necessary evil for all homeowners. They are used to fund local schools and a variety of other government programs and services in the city or town where your home is located. The tax rate is set by your state and is calculated annually based on your home’s assessed value. Funds are typically taken out of an escrow account that you establish when you buy a home, so you might not even know that they are happening. Homeowners Insurance Much like car insurance protects your vehicle in the case of an accident, homeowners insurance does the same thing for your house in the event of a natural disaster, fire, or other event that damages your property. Like property taxes, the cost varies based on where you live and how disaster-prone the area is. You might be able to save a little money by bundling your homeowners insurance with your car insurance or life insurance through the same company. Private Mortgage Interest (PMI) PMI is required for anyone who buys a home with a down payment less than 20 percent — which, let’s face it, is most homebuyers these days. It protects the bank or mortgage lender in the event that you default on the loan. Paying a few hundred extra dollars per month might seem like a nuisance, but it can pay off in the long run if you make a worthwhile investment on your home. Utilities This one seems simple but is worth mentioning as a reminder. As a homeowner, you will be responsible for all of your utilities (water, electricity, heating, etc.) and associated bills like Internet and cable. Chances are, your new home is larger than where you lived previously, so plan to have some wiggle room in your budget until you see how things play out in your new space. Homeowners Association (HOA) Fees Finally, if your new home is part of a community with a homeowners association, you’ll need to pay the associated HOA fees. These fees range from a few hundred to a few thousand dollars per month and most commonly cover maintenance of the community’s common areas — lawn care, snow removal, etc. In some higher-priced communities, HOA fees may also cover community event spaces or even things like on-site fitness facilities. Again, it’s important to know what these fees are upfront so you can work them into your budget and leave some wiggle room to enjoy your new home!  Long recognized for exterior design of homes, stone has become a popular choice for interior design as well. It is durable and has a wide color and texture variation. Here are some ways to incorporate stone into your interior design or renovation!
 When you finally find the home of your dreams, it can be easy to put blinders on and ignore warning signs that might be right in front of you. Those red flags may not be so clear for an undiscerning eye to detect!
Either way, there are a few common problems that should be enough to give pause to any prospective homebuyer. These are not necessarily deal breakers, but definitely things to keep in mind as you are weighing the pros and cons of a new home. DIY Gone Wrong In an effort to save money before putting their home on the market, some sellers take on do-it- yourself projects that don’t always end well. These projects can end up costing you a lot of time and effort to undo the substandard work and replace it with a better solution. These types of projects most commonly occur on outdoor decks and home additions. If anything looks questionable, make sure to ask about it during the home inspection and request copies of the permits used to complete the work. Mold or Water Damage This is another area that can end up costing a ton of money to repair if not noticed before a home is sold. Look for places on the walls or ceiling that look like they’ve recently been patched or replaced. Foggy windows are another telltale sign of moisture problems in a home. Check them for condensation and ask the seller or your home inspector about anything questionable that you see. Keeping Up with the Joneses Beyond the house itself, the state of a home’s neighborhood says a lot about whether it’s a place you want to live. Are the lawns well maintained? If there’s a holiday coming up, are the homes decorated to reflect it? These might seem like trivial things, but your dream home can turn into anything but that if your neighbors are not hospitable. Your home’s value can also decrease based on a lack of curb appeal in the neighborhood, especially in a weak housing market.  A home equity loan can be a great way to pay for home repairs or other expenses utilizing the value that your home already has. However, it can do more harm than good if not used properly.
Here’s what you need to know before you sign on the dotted line: What is a home equity loan? A home equity loan, sometimes referred to as a second mortgage, is a loan that allows homeowners to borrow against the equity in their home. Like any other loan, the money is received in a lump sum and paid back over time with interest. These loans are commonly used for home renovations but can be used for anything from debt consolidation to paying for college. Your bank will determine how much you can borrow and what the term of the loan will be. Home equity loans typically take between 5 and 15 years for repayment, depending on how much you borrow and what you can afford to pay each month. Home equity loan vs. HELOC A home equity line of credit, also known as a HELOC, is another type of loan that utilizes your home’s existing value. Unlike a home equity loan that’s disbursed in one lump sum, a HELOC is available for withdrawal on an ongoing basis. Another way these loans differ is in the interest rates. A home equity loan has a fixed interest rate for the duration of the loan, while a HELOC has a variable interest rate. Given this information, which loan should you choose? Home equity loans are most commonly used for larger, one-time expenses, while HELOCs are used for smaller, ongoing expenses. Red flags to avoid As with taking on any type of debt, you want to make sure that you have a good reason for taking out a home equity loan or HELOC before making a final decision. It might be tempting to use the money to buy something new or go on a dream vacation, but don’t borrow more than you can realistically afford to pay back. You’ll also want to carefully evaluate your home’s value and its projections over the life of your loan. If you plan to sell your home while the loan is active, you’ll need to make enough money to cover your original mortgage plus the home equity loan or HELOC. 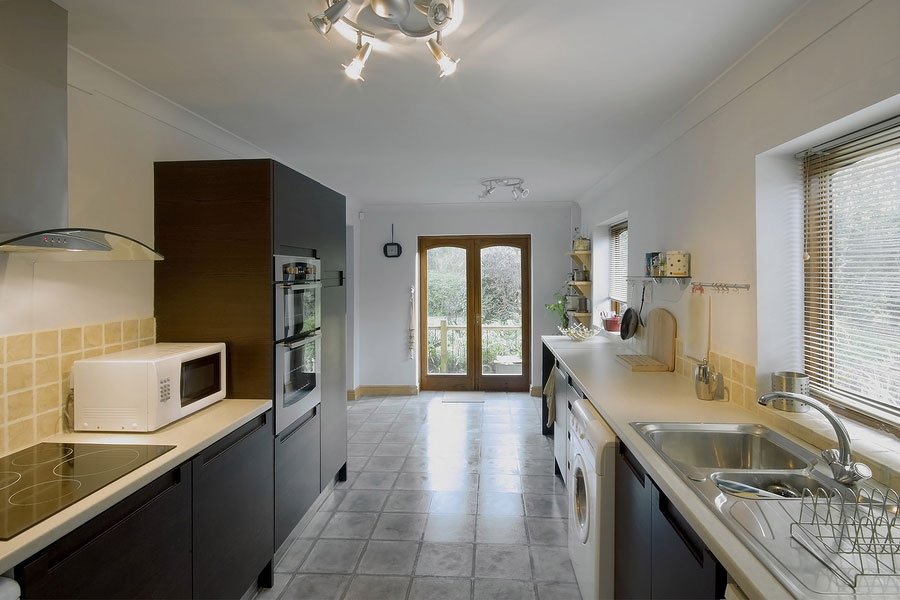 It’s summer, and it’s time to hit the road for vacation. Your trip is booked and your bags are packed, but what about your home?
There are a few things you can do before you leave for vacation to ensure that your home is safe and sound when you return. After all, home is the last thing you should have to worry about when you are away. Check Expiration Dates The last thing you want is to come home to a smelly house caused by food that’s gone bad while you were away. The day before you leave, go through the refrigerator and remove anything that’s likely to go bad while you’re away. The same thing goes for fruit or other items that are stored at room temperature. Rather than throwing the food away, try to freeze as many items as possible, or give it away to friends and neighbors. A clean pantry and fridge will also keep bugs and other pests from getting in. Set Timers These days, just about everything in your home can be placed on a timer. You can program your lights and thermostat to turn off and on at certain times to ensure that your house does not get too hot or cold — and that it does not look completely dark and deserted. You can also keep an eye on many of these same things through remote monitoring apps like the Nest thermostat and August Home Security. The decision about whether to utilize these tools depends on how connected you want to be to your home while you are on vacation. Disconnect and Unplug No matter whether you use monitoring apps, there are a few things that should be completely turned off during vacation. Turn off the main water line so that you do not come home to a flooded basement if something happens that you can’t see. Turning off the water is not recommended in the winter when pipe freezes are more likely, but is not a problem during the warmer summer months. In addition, unplug any major appliances and electronics. Not only will this reduce the electricity used, but it will also decrease the risk of electrical fires that can damage your home.  A wooden deck adds living space and value to your home. It is a great place for relaxing, entertaining, and outdoor dining.
If this is your first deck or patio project, keep it simple. Later, when you have gained expertise you can enhance your deck by extending its length and/or width, adding multi levels, steps and other features. There are several wooden patio plans available on line or at building supply stores like Home Depot and Lowe’s. Staff will help you calculate the wood and hardware you need as well as offering advice about choosing materials and building tools for this DIY project. Don’t forget to use safety equipment including a hard hat, steel-toed work boots, safety glasses, work gloves, and ear protectors. When choosing the wood for your deck or patio, look at options that were not available a decade ago. There are several manufactured materials and exotic woods now on the market in a wide price range. Consider the appearance, maintenance required for upkeep and the kind of weather your deck will experience. If this is a first project, consider how costly the materials are and how tricky installation is going to be. Get yourself a good set of plans and follow them faithfully. When you are more experienced at building a wooden patio, you can add your own enhancements. Your first challenge is installing posts to anchor the deck. Follow building instructions for how to use batter boards and masonry string lines to lay the footings. Use a posthole digger to dig holes at least a foot deep. Use tube forms so footings are level and an inch above the ground. This job will take a DIYer the better part of a day. Of course, the job will go faster and be more fun with a crew of DIYers. The next step is to cement those posts in place. Don’t forget to leave tops of the posts open for adding the structure. Use ready-mix concrete. Place anchor bolts in the centre of each post before cement hardens and align those anchors with a board, making sure of diagonal measurements so the anchor positions are square. Allow at least four hours for cement work. Next, you need to attach the beams to the post anchors. Doubled 2 x 6’s make the best beams. When you are attaching them to the post, anchors insert a half-inch shim between the beams at each footing. This job will take two or three hours. Make sure beams are aligned before taking the next step. Follow deck instructions for adding rim joists and angle brackets. Attach inner joists to beam faces next. Make sure nails are hammered straight and they are flush with the boards. Fasten decking. Make sure boards are aligned. Fasten twice in the centre of each joist and about an inch from the edge of each board. Trim deck boards so edges are even. Add a prefabricated railing or create one of your own. |
More articles:
August 2018
Categories |
 RSS Feed
|
Contact Kirsten to get started today.
(310) 756-3524 [email protected] #DRE 01450452 Ask her about her newsletter to get current South Bay Market information and real estate news right to your inbox... no spammy ones, promise! |
|
Copyright © 2021 Kirsten Cole. All rights reserved.