 So you’ve decided the exterior of your house needs to be repainted. Whether this is a project to improve the curb appeal of your home for resale, or you want to improve the aesthetics of the place where you live, consider repainting the exterior as an investment in the value of your house.
Faced with the mountain of choices for color, paint style, whether to do it yourself; the decision to repaint can be daunting. Here are some tips: Keep it simple. When people see all the colors available they sometimes get carried away. Consider your house paint like an artist sees a blank canvas. You can add color in shrubs and flowers. Don’t make your house the neighbors refer to as “the ugly blue raised ranch”. Avoid highlighting things like eaves troughs, gutterspouts, and garage doors by painting them a contrasting color. They should blend in not stick out like a sore thumb. Give thought to what surrounds your house. Large shade trees, porches, shrubs tend to make a house look darker. Go with lighter exterior paint. Think about the color of shingles, walkways, other materials like brick and stone trim or driveway. Make the color you choose blend with these. If you have an interesting architectural detail like trim, a widow’s walk, a weather vane, gargoyles, a verandah that you want to highlight, consider using contrasting color or a darker or lighter shade of the same color on these. Consider the size of your lot. If you have a large lot and a small house, go with white, off white or a lighter color. On the other hand, if you have a large house on a small lot, darker color will make your house appear smaller but substantial. White and off white were always considered safe choices. Today people are going with tints or shades of greys, browns, greens, and blues because these complement the landscaping and other house materials. Before you decide on a color use an app to see what it will look like on your house. These apps can be downloaded to your smart phone or you can use a program available at most paint stores. Do it yourself or to hire a painter? This is a big, costly, time-consuming job requiring specialized equipment and heights! Unless painting is your profession.
1 Comment
 First, let’s be clear on what is meant by a laminated floor. This product is a bit of a hybrid in the flooring industry. It looks so much like a hardwood or stone floor that it can easily be mistaken for the real thing. However, it is not stone or wood. Laminate floor is actually vinyl tiling—sort of and engineered flooring.
Why laminate flooring? It gives the look of wood or stone without the cost and maintenance. It is also easy to install for DIYers and a cinch to keep clean. Because laminate flooring “floats,” there are no issues with nailing that plagues hardwood installation. The first step is to remove whatever was on the floor. Pull up carpet and underpadding. If there are tack strips remover those too. You may have to pry these up with a crowbar. Next, remove baseboards. You are now down to the subfloor. Make sure it is level. Use scrapers or putty knives to remove any lumps of glue or other previous flooring debris so the floor is perfectly smooth. Then sweep or vacuum what you have scraped off the floor. Make sure you get all those carpet tacks! Now you are ready to install laminate floor. Make sure the subfloor is perfectly level. If it is not, your laminate floor may have “spongy” spots where it creaks or moves. Sand out high spots or use a leveling compound so the entire floor is flat and even. This is tedious work but well worth the effort. Be diligent with your level to ensure perfect flat, even subfloor. Choose the flooring materials that will best suit your needs. Laminate materials vary in thickness and warranty. Some come with pre-applied padding. This saves an installation step. The most realistic ones have V-shaped edges. The thicker they are the more substantial the floor will feel and the longer the warranty. Next, “introduce” the laminate floor materials to the room where they are being installed. Give them three or four days to get acclimated. Measure the room and the width of planks so you know how many planks you need. Decide if you will need to cut the last row to fit. Undercut doorframes so planks will fit snugly. Install underlay if it does not come pre-applied to the planks. Lay the first row of planks cutting the last piece to fit the end if needed. Assemble by rocking the end tongue and groove joints together. Use even, firm pressure. Continue with each row until your floor is done using manufacturer’s installation tips for completing the project at doorways and corners. Replace baseboards and admire your finished product! Conclusion Laminate flooring is an inexpensive floor alternative. It lends beauty to almost any room in your house. Avid DIYer can install this flooring and make it look professional. However, avoid laminate floor in bathrooms and laundry rooms as the floor can buckle and warp in rooms that experience high moisture. If your kitchen gets spills, avoid laminate flooring there too as the spill can get under the floor before you get it mopped up. Anywhere else in your house, laminate floors provide the look of stone or hardwood without the high cost of materials and installation. 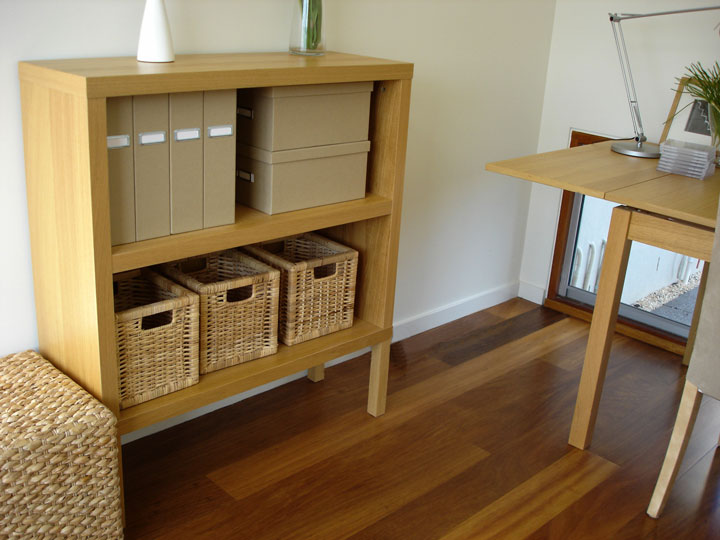 There’s a plethora of home organizing products on the market today that can help get your drawers, closets, kitchens, bathrooms or garage tidy and aesthetically pleasing. Here are some neat organization tools that may help save you time searching for lost items and create more space!
Get an organizer that divides the “junk drawer” into spaces. Empty it out and categorize various items.  Here are a few cost-saving home improvements you can make when you move into a new home!
1. Check Your Energy Efficiency Low energy costs are a selling feature, but they also save you homeowner costs. Many local utility companies may offer free energy efficiency inspections of your home and/or energy saving workshops. 2. Put Your Money where it Counts Realtors will tell you that while a kitchen or bathroom remodel is nice, putting time and money into a new roof, repairing your home’s exterior, or upgrading plumbing can be a wiser investment. It will pay off in energy efficiency and safety, avoiding costly future repairs. 3. Look at Kitchen and Bathroom Renovations While structural improvements are a safe and wise investment, adding features like granite counter tops, upgrading appliances, or renovating dated bathrooms can help make your house more appealing for future buyers. 4. Consider Curb Appeal Make your house inviting by adding flower beds, tending lawns and making your entrance way attractive. Check out the curb appeal of homes you admire and study landscaping magazines and gardening columns for ideas. 5. Attend to Home Maintenance If you’re spending thousands on home renovations but your improvements aren’t well maintained, then it could become money wasted. Make sure the structure—foundation, roof, electrical, plumbing—are in good order. 6. Think About Adding On Enlarging a room or adding an additional room could increase your home’s resale value. Try adding a sunroom, family room, or an extra bedroom!  Let’s take a look at five neighbor types that may become a challenge to deal with, and how to get along with these individuals!
1. Dangerous Neighbors: Whether they deal drugs, fight with neighbors, throw wild parties or are registered pedophiles, these are people best left to the authorities. Keep your distance and try not to be a target. 2. The Home Devaluers: Though often friendly and helpful, the face value of these neighbor’s home may be lacking. Maybe the lawn is a pasture, or perhaps their house needs an exterior makeover. The driveway could be full of toys, bikes, and cars in various stages of repair. Their pets may wander the neighborhood defecating on your lawn. The first line of defense against those neighbors should be open communication. Point out politely the problem, and be prepared for antagonism or resistance. You’re probably not the first neighbor to complain. Document the date of your dialogue, and if you have a Home Owner’s Association, get them involved. 3. The Joneses: There is always someone in the neighborhood whose goal is to be richer, showier, and superior to others. Be pleasant and aloof, instead of trying to keep up. 4. The Crazy Ones: Someone is always the neighborhood snoop and/or the one who visits unannounced and stays. Be friendly, but be clear about where you may need to go next or if you are on a tight schedule. 5. Difficult People: These are the neighbors who are always trying to cause trouble with gossip pitting one neighbor against another. In their case, a small amount of contact goes a long way. Keep your distance, because these relationships can be toxic.  There’s a plethora of home organizing products on the market today that can help get your drawers, closets, kitchens, bathrooms or garage tidy and aesthetically pleasing. Here are some neat organization tools that may help save you time searching for lost items and create more space!
 If you want your house to appeal to potential buyers, then you’ll need to prepare it properly for an open house. Here are some tips on how to do so!
 Want to increase your home’s value without spending too much? Here are some helpful tips:
 When you move, it can be a huge adjustment even for the family pet. Here are several tips to help your pet adjust through the changes!
1. Be as Consistent as Possible For many pets, keeping a consistent schedule for feeding, bedtime, and walks reassures it that it has a spot and the relationship with you has not changed. While moving often puts schedules out of sync, it’s important to alleviate your pet’s stress by keeping its time and possessions as unaffected by the move as possible. 2. Don’t Make Major Changes It’s tempting to “clean house” before you move, but keep in mind your pet is comfortable with things like that old chewy toy, favorite bowl, and bed. The new house is already a place to adjust to, so don’t throw out any objects that it is already comfortable with. 3. Minimize Stress If your pet will be less stressed in his crate, sleeping with another pet, or being in the same room as you are, try to accommodate. Take note of his patterns and adjust accordingly. 4. Be Lavish with Your Affection Your pet may be feeling transplanted, so it’s important to make it feel valued and loved. Make an effort to give it lots of affection, hugs, brushing, and walks. If possible for the first week or two, try to have a family member present in the house. 5. Ask an Expert Before your move, talk to your veterinarian about ways to ease the stress of the physical move and settling into a new home. The vet may have some good strategies and tips to minimize the stress of the move for your pet! 6. Try to Remain Calm Pets can pick up on your tension, just like children can. If you remain calm and collected about the move, it could help manage the pet’s stress as well. 7. Do an Initiation Tour If possible, do a tour of your new home with your pet before the move. Give it a chance to poke around. Set up a feeding location. If Kitty Litter is part of your pet’s move, set that location up too. Let your pet get a “feel” for his new digs. 8. Take a Walk Take your pet on a walk to meet the new neighborhood and get introduced to his new two-legged and four-legged friends. |
More articles:
August 2018
Categories |
 RSS Feed
|
Contact Kirsten to get started today.
(310) 756-3524 [email protected] #DRE 01450452 Ask her about her newsletter to get current South Bay Market information and real estate news right to your inbox... no spammy ones, promise! |
|
Copyright © 2021 Kirsten Cole. All rights reserved.